I talk a lot about repeating sections here, and for good reason. They allow us to collect repeating data in a clean format without having to add a static number of controls. In the past I have provided examples on repeating section in DocGen, O365, and some on-prem solutions using repeating sections. In this blog, I wanted to cover how we can take repeating section data from our Start Event Form in Nintex Workflow Cloud (NWC) and present it in a task form for someone to review.
Use Case
The use case for this is straightforward enough, but to put it into context, we are going to create a form to collect repeating data and then route that data to someone for review. In the past, we would have broken out each line item in the repeating section as their own review step, but this time I want to review it as a whole. Currently within Nintex Workflow Cloud, there is no way to simply push the repeating section data that is in the start form directly to a task form repeating section control. However, we can present the data in a clean table format on the task form or even in an email.
Start Form
For this start form I just built out a simple with just a repeating section because I want to focus on this functionality within the workflow. You could easily add in other controls if needed, but for now, let’s keep it simple.
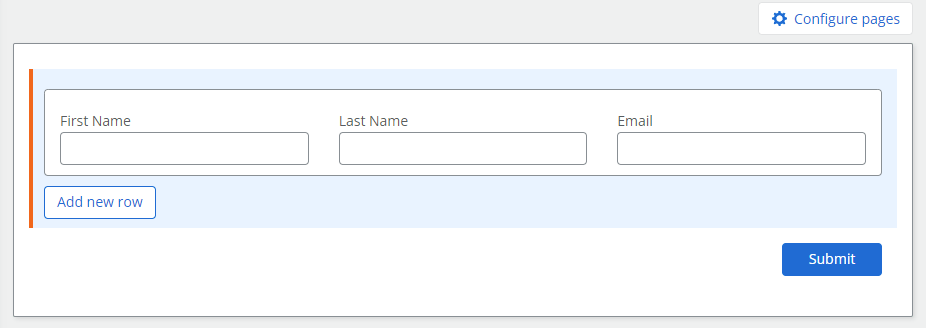
I added to the repeating section three controls, first and last name as well as email address. If you are adding other controls, you may need to parse the data further to get just a simple text string to make things clean. Once you have your form built, we can move on to building out the workflow.
Workflow
In the workflow, any number of things could be going on, but in order to get the repeating section data from the start form and into a task form, we are going to build out three parts to piece it all together. In order to put this all together, we are going back to good ‘ol HTML. If you need a refresher, check out https://www.w3schools.com/html/html_tables.asp for some basics. I broke this out into three parts to help validate the data and to easily make changes later on. Here is how I approached it:
- Create a text string – Create the Table CSS
- Create a text string – Create table row (this will be inside a loop for each row)
- Create a text string – Create full table

First up we are going to make the table look like a table and not just a data dump. You do not have to add this, but it does make it look much cleaner. Feel free to create your own or go off of what I have below for the first step.
<!DOCTYPE html>
<html>
<head>
<style>
table {
  font-family: arial, sans-serif;
  border-collapse: collapse;
  width: 100%;
}

td, th {
  border: 1px solid #dddddd;
  text-align: left;
  padding: 8px;
}

tr:nth-child(even) {
  background-color: #dddddd;
}
</style>
</head>
<body>
Once all of the CSS is finalized, be sure to store it to a variable, something like table_css.
Next up, we need to loop through each row in the repeating section and pull out all the necessary data to build out each table row. For this we will need a Loop for each action and within the loop we will build out our row to be used within the HTML table.
table_rows
<tr>
<td>[[First Name]]</td>
<td>[[Last Name]]</td>
<td>[[Email]]</td>
</tr>Note that in the above section, table_rows, [[First Name]], [[Last Name]], and [[Email]] are all variables that are being inserted. [[First Name]], [[Last Name]], and [[Email]] are all variables that are being pulled from the repeating section within the loop action, and table_rows is the workflow variable this block is being stored to. We add it to the top of this text string so that every time we loop through and add another row, it text is appended to the end and then stored back to the variable.
Lastly, we need to put it all together to make an actual table to be used on a form or an email. To do this, we create one variable that has all of the pieces that we have put together thus far along with the necessary table headings for each column. For my example, I have “First Name”, “Last Name”, and “Email Address”. Note that table_css and table_rows are both of the variables that were created before. Here it is all put together and saved into a variable simply called table:
table_css
<table>
<tr>
<th>First Name</th>
<th>Last Name</th>
<th>Email Address</th>
</tr>
table_rows
</table>
</body>
</html>Task Form
Now that we have a variable that has the formatted table data in it, we can use it to populate a task form or even sent it in an email notification. In order to add this to a task form, simply add a label control to the task form and insert the workflow variable (table in my scenario).
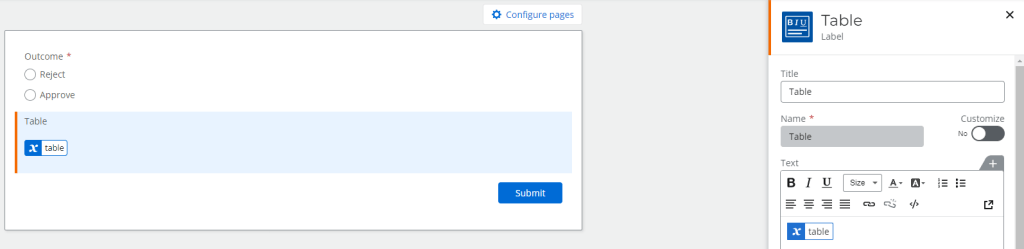
When the form is created for the user to review the task, the data will render in the table format rather than just raw text. This can also be done on the task notification (or any email) by simply adding the variable to the body.

End Result
Start Form

Task Notification

Task Form

Final Thoughts
This is a great workaround for those looking to get the repeating section data out of the start form and presented in a clean, formatted way for end users. While this still does not allow for users to edit existing data that was already submitted, it does give them a chance to potentially catch errors and adjust where needed. Repeating sections within Nintex Workflow Cloud forms will continue to be worked on and features will be added, but until then, let me know what else you would like to do in the comments below.

Leave a comment