Repeating sections are great and there are a ton of use cases where it make your life as a developer easier to capture data from end users. However, when you want to move that data from one place to another, there are considerations that need to be addressed. For example, if you were to build a form in Nintex Workflow Cloud with a repeating section, the data object that is stored is quiet different than if you were to do the same using Nintex Forms for Office 365. So then how do we store the data from NWC to a SharePoint Online list and have it populate on a Nintex Form? It is fairly straightforward, but there are somethings that you will need to do in order to get things moving. Let’s dive in!
Use Case
There are plenty of use cases for this, but for this we need to have a public facing, anonymous form to be filled out and then sent to a SharePoint list so that internal employees can perform their duties. We will focus on leveraging Nintex Workflow Cloud to handle the anonymous form to capture the data and then send the data to a SharePoint Online list using workflow. The main point here is to ensure that the data stays intact and structured the same way in the form in Nintex Form in SharePoint Online as it was submitted using the Nintex Workflow Cloud form.
Setting Up The SharePoint Form and List
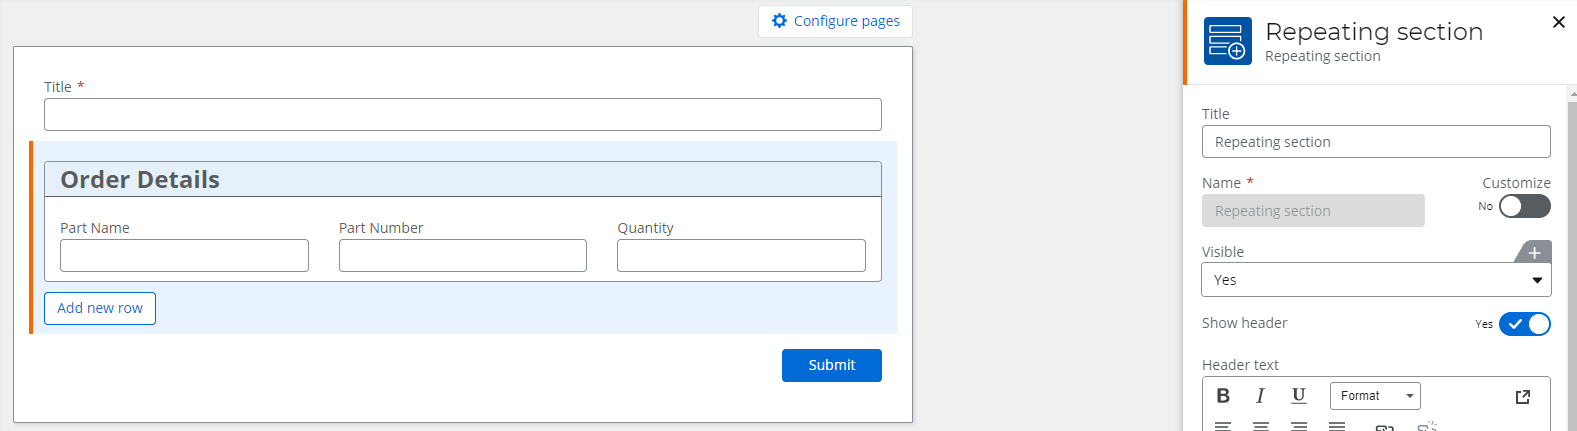
Before we get too deep, ensure that your SharePoint Online list is setup to capture the repeating section data (XML) in a list column. You will need to create a Multi-Line text column on the list and connect the form to it. To do this, simply open your Nintex Form and connect the Repeating Section control to the desired Multi-Line text column in your list.

This will allow us to read and write data that can be populated in the repeating section in the form. Once you have that setup, submit a test form to ensure that the data is writing back to SharePoint and you should see the XML structure, something like this:

Be sure to note the XML structure as you will need this later as you will need to replace the nodes with the data from NWC.
Now that we have the SharePoint form and list all setup, let’s take a look at Nintex Workflow Cloud and how to move the data.
Setting Up Nintex Workflow Cloud
Starting with the anonymous form in Nintex Workflow Cloud, it can be designed however you wish, but ensure that the repeating section contain the data points that will need to be populated in the SharePoint Online form. In this example, they are exactly the same to ensure nothing gets missed.
Once the form is all setup and ready to go, it is time to build out the workflow to send the data to our SharePoint Online list.
In order to send the data to our SharePoint Online list and have it populate our Nintex Form, we will need to create the proper XML structure that the form can use. We will have to use the XML structure that we got above from our list and replace the values of the nodes with the values from our NWC form. This can be accomplished by using a loop to iterate through the repeating section. Here is how we will approach the workflow:
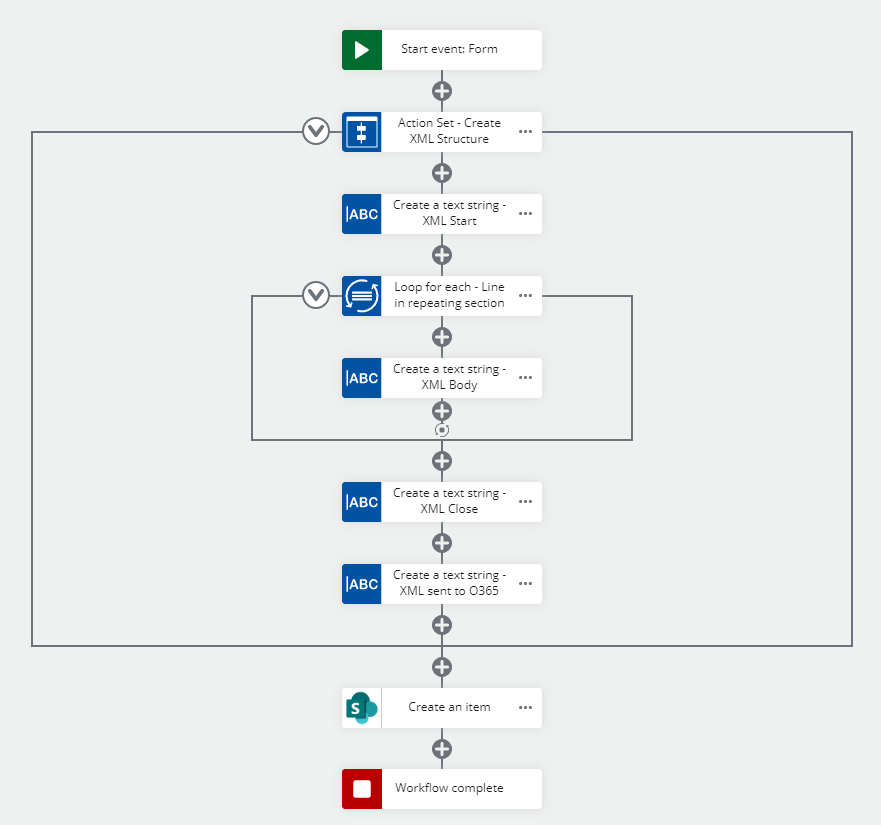
The main focus is everything in the Action Set – Create XML Structure. Here we are building out the parts of the XML: XMLStart, XMLBody, XMLClose, and XMLtoItem. The reason we approach it this way is because we can setup the nodes within the XML (the <Item>) within the loop and setup the opening and closing nodes separately. Lastly we will combine all of the variables into one and send that to our SharePoint Online list to keep things clean. Let’s take a closer look at each step.
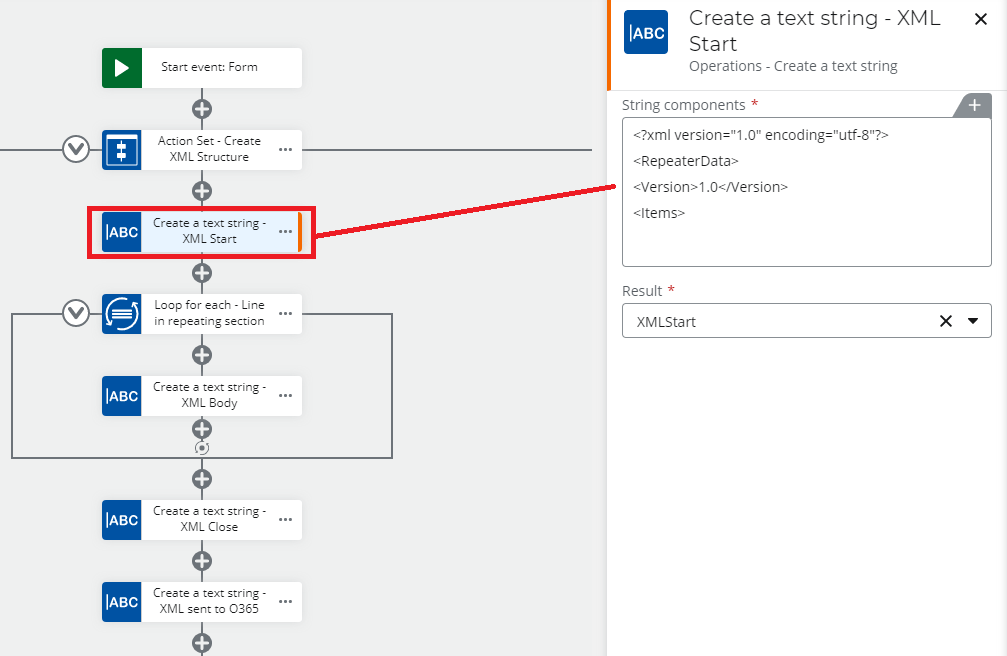
XMLStart
For this you will need to set the variable to the the first section of the XML (that you have from you SharePoint Online list) up to the <Items> node:
<?xml version="1.0" encoding="utf-8"?>
<RepeaterData>
<Version>1.0</Version>
<Items>
XMLBody
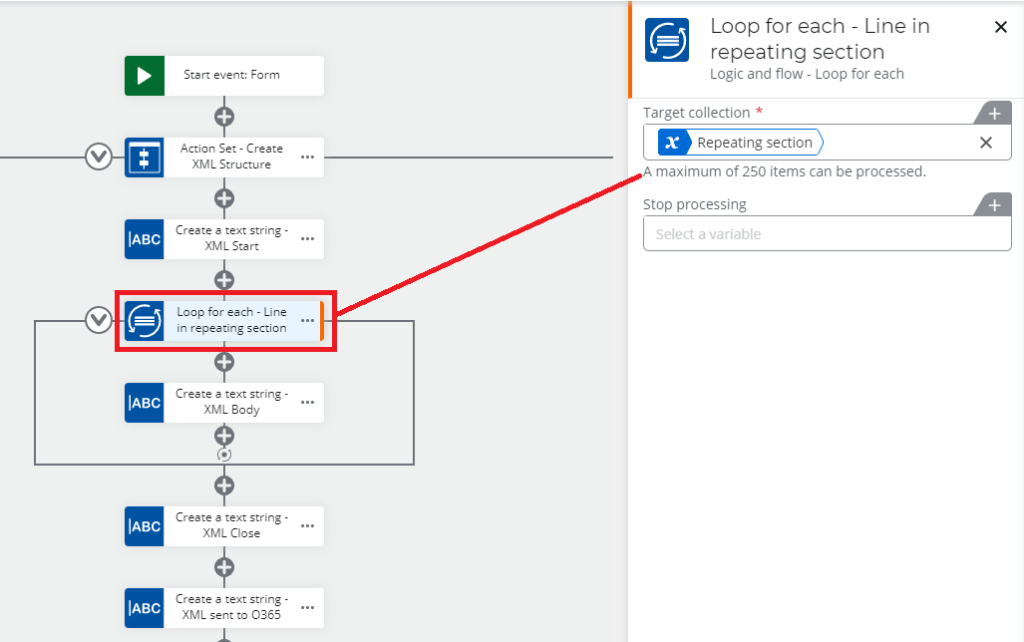
Here we will use a loop to iterate through the repeating section in the NWC form to ensure we get all of the data we need.
Within the Create a text string action that is inside the Loop for each action, we will be replacing the node values with the variables from the repeating section. Again, use the XML structure from your SharePoint Online list to accomplish this. Here is what mine looks like:
<Item>
<_0ea73348dbc9b88872765c539ab571a1 type="System.String">INSERT_VARIABLE_HERE</_0ea73348dbc9b88872765c539ab571a1>
<_2d7f4e72a5a9b9a2df634603940a6fbb type="System.String">INSERT_VARIABLE_HERE</_2d7f4e72a5a9b9a2df634603940a6fbb>
<_779096b47884119f246fc8dc033cc15c type="System.Int64">INSERT_VARIABLE_HERE</_779096b47884119f246fc8dc033cc15c>
</Item>
Once all nodes have been replaced, the last piece is to add the variable that you are storing this to is added to the beginning of the text string. This ensures that if there are multiple items in your repeating section that they are added to the end of the body. This avoids having the repeating section data show up in the SharePoint Online list in the reverse order than what was submitted in Nintex Workflow Cloud. In the screenshot, I am using the variable XMLBody.

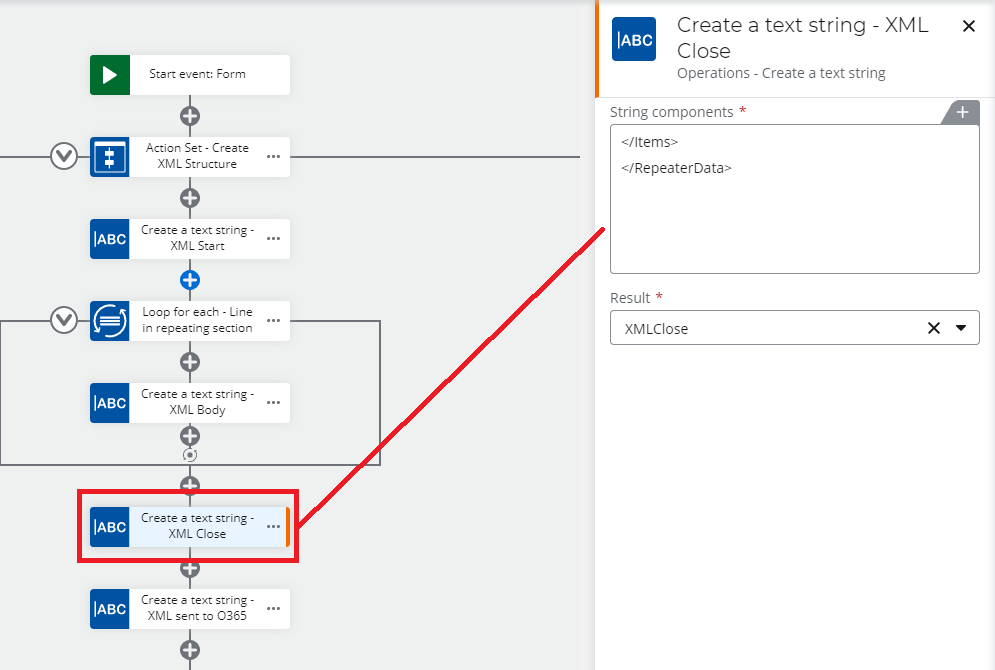
XMLClose
Similar to how we setup the XMLStart variable, we want to ensure that all of the nodes are closed properly. Here is what it should look like:
</Items>
</RepeaterData>
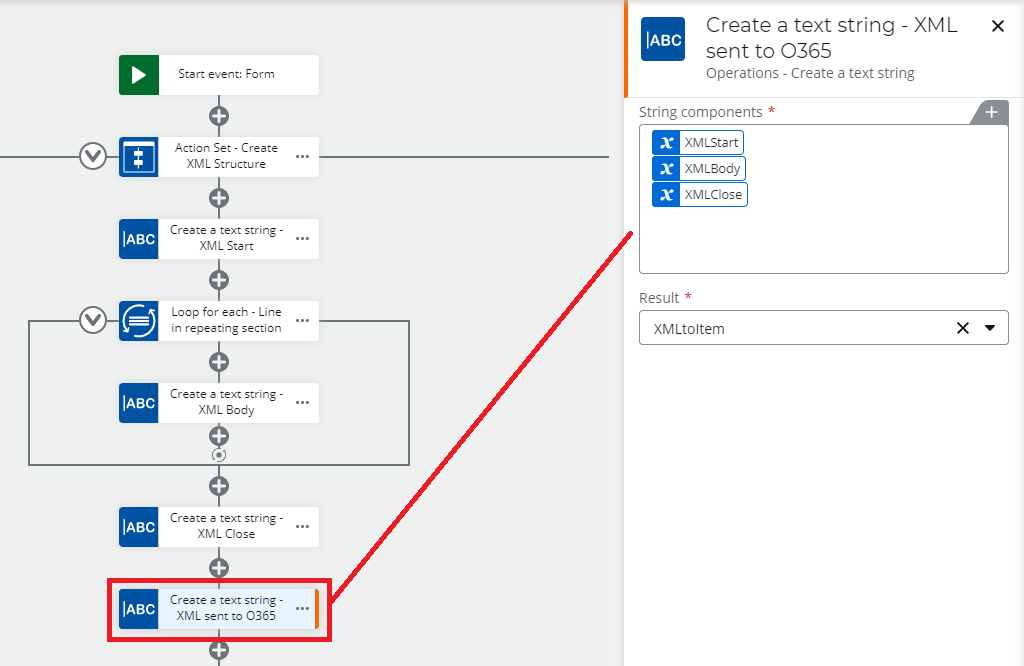
XMLtoItem
Now that we have all of the parts for our XML structure, let’s put them all together so we are sending one variable instead of three! This is to keep things simple in the last step when we create (or update) the list item in SharePoint Online. Keep in mind that ordering does matter here, so be sure that your variables are in the proper order!
Sending the Data to SharePoint Online
The last step of our workflow is to send the XML to our SharePoint Online list so that it can be viewed on our Nintex Form. In my workflow, I am creating a new item in my SharePoint list. This will work for updating existing items as well, you would just need to use the Update Items action and select the correct item to update based in your conditions. Here is a look at how Create an item is setup:
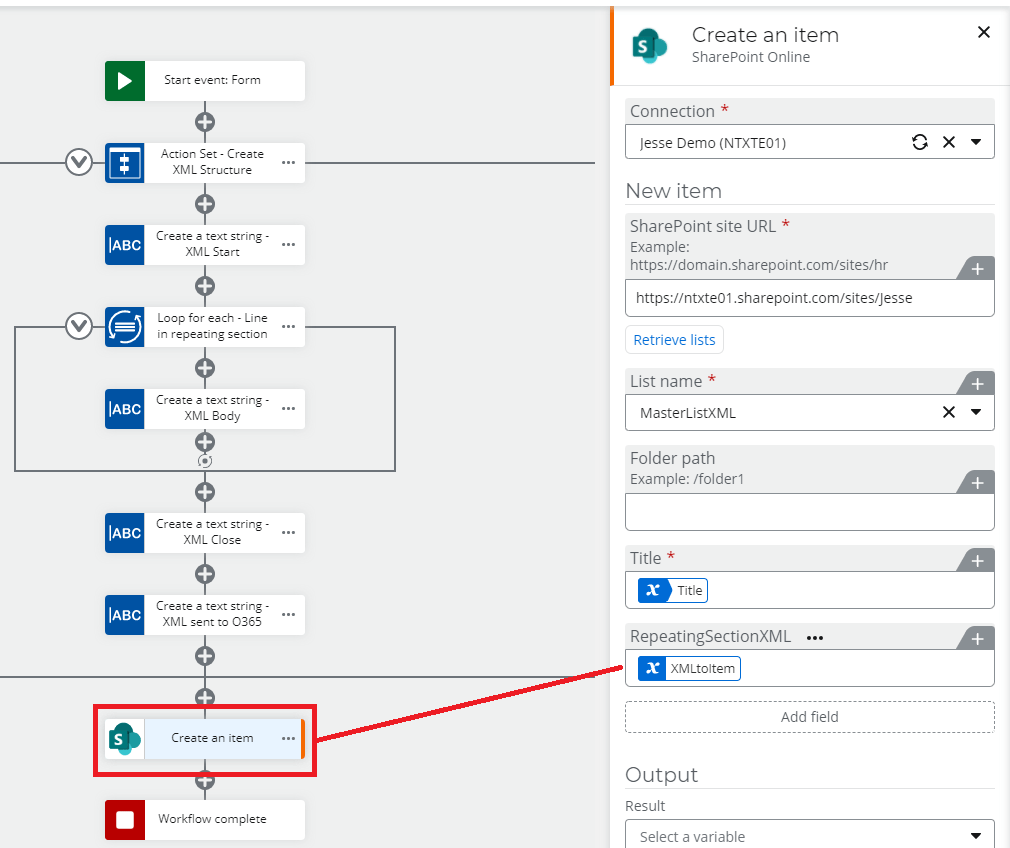
The key to this is to ensure that the column in the list that holds the form XML data is updated with the XML that was pieced together in the workflow. Once everything is in place, we can test it out and see the repeating section data move from the form in Nintex Workflow Cloud to our SharePoint Online list, but more importantly, be visible on our Nintex Form in SharePoint Online!
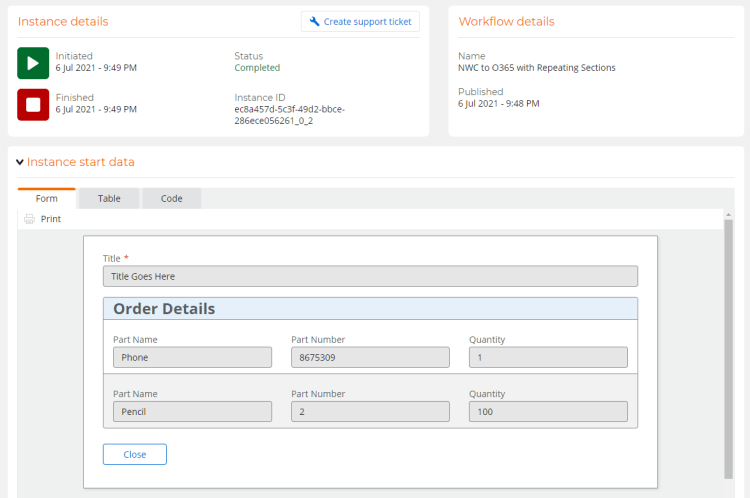
Form Submitted in NWC 
Nintex Form in SPO
Final Thoughts
As more and more organizations look to consolidate what tools they use it becomes important to understand how to leverage what is available to ensure that data can be usable across multiple tools and platforms. With Nintex, you can easily capture repeating form data and store it where ever or how ever you require.

Leave a comment