I had a specific use case come up with a prospect recently around pulling data from an Excel workbook. The data needed to be validated against the data that they had in their records. Using Nintex Workflow Cloud, we were able to upload an Excel file into OneDrive and then pull data from that file to validate. I won’t go into detail on how things were validated but want to share how we can pull the data from Excel and use it within a workflow as well as how to find the Excel file in OneDrive.
Getting Started
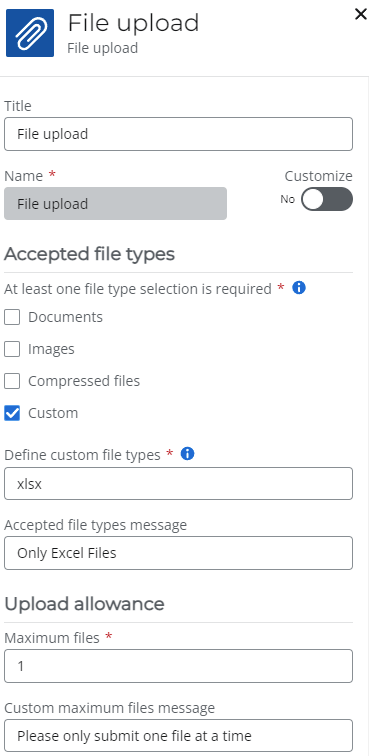
Keeping things simple, we will begin with the form. The main control that is needed is the File Upload. This will allow for the Excel file to be uploaded and then passed to OneDrive. When configuring the File Upload control, you may want to consider limiting the number of files to be uploaded and even the extension to only allow .xlsx files. This will ensure that only one file will be uploaded, and it will be an Excel file.
Alternatively, you could leverage an Excel file that already exists within OneDrive and not worry about uploading a file. If you want to go in this direction, you can skip over the next parts and move right to the Get Table Data section and see how to pull data from an Excel file.
The Workflow
Now that we have the form sorted out, we can move on to uploading the Excel file to OneDrive so that we can extract the required data from it. This is super straightforward and only requires one action, “Store a file”. In order to use the Excel actions within Nintex Workflow Cloud, the Excel file must be stored in OneDrive. We do have actions for pulling data from Google Sheets, but perhaps we will cover that in another post.

With the Excel file uploaded and now sitting in OneDrive, we can extract the required data from it. In order to do this, we need a few things; the file name, and a way to search our OneDrive for that file. First, let’s get the file name. This can be pulled from the File Upload collection variable within the workflow. The File Upload variable is a collection because it could contain multiple files, but if following along in this scenario, there will only be one file, so we can pull the data from the collection where the index is “0”. Once we have the data, we simply query the JSON looking for “$.blob.fileName”. Here is an example of the raw data along with the parsed result:
File Upload: [“{\”blob\”:{\”name\”:\”999a9999-aaaa-999a-a999-aaa999999999/aa99a9a9-9a99-999a-999a-9aa99a99a99a_9_9/999999aa-99a9-9aa9-99a9-9a9aa9a9a99a\”,\”fileName\”:\”AnotherExcelFile.xlsx\”}}”]
Parsed File Name: AnotherExcelFile.xlsx

Next, we will need a way to get the workbook ID. Since we are using the form and workflow to upload the file, we cannot select it from the dropdown menu in the Excel action. So how do we get the Workbook ID? Well, honestly, there is not an easy way within Nintex Workflow Cloud other than to go through the GraphAPI…which is exactly what we do! However, rather than writing that call, why not use an Xtension within Nintex Workflow Cloud?! Below is a download of the .json xtension file along with the instructions on how to set it up in your environment.
With the file name ready to go, we can use it to find the workbook ID using the xtension we just added. The xtension is expecting a file name (this is what will be used to find the file) and then return a collection of results. It returns a collection because there may be similarly named files it the result could return more than one file. Due to this, we will then need to loop through the collection to match on the file name exactly.
I built out the xtension this way to allow for other use cases than just this one I am building out. There may be a need to find multiple Excel files that all have “customer” in them or possibly different versions. The xtension is flexible to accommodate different scenarios and can be adjusted to return more data if required. For now, I am simply returning 2 data points: file name & ID.

The Get File Metadata action above is the xtension followed by the loop actions to get through the resulting collection. Within the loop, if we find a match to the file name that was uploaded, we store the workbook ID. For this scenario we know that the returning collection only has one file, but you may have more and may have to adjust the logic here based on your business needs. Ultimately, we need the workbook ID for the Excel file you wish to pull data from. Once we have that, we can move on to the next step of pull data out of the file.
The Excel File
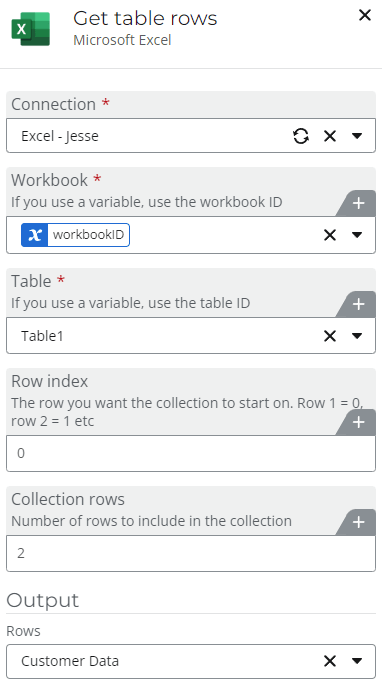
This is honestly the easier part of this scenario because there are already Excel actions within Nintex Workflow Cloud. All that is required is to configure the actions and then do something with the data. Let’s start with getting the data. We can either get data from the Excel file by either columns or rows. Both will return data from the file but deciding which to use is dependent on how you want the data returned; all of the data per row or all of the data per column. In this scenario, I only want to pull out the first two (2) rows of data and only the first two (2) columns is required. I prefer to get the row data because the data is setup so that each row is a full set of customer data. If the data was setup to associated all in one column, using the Get table columns action would be a better approach.
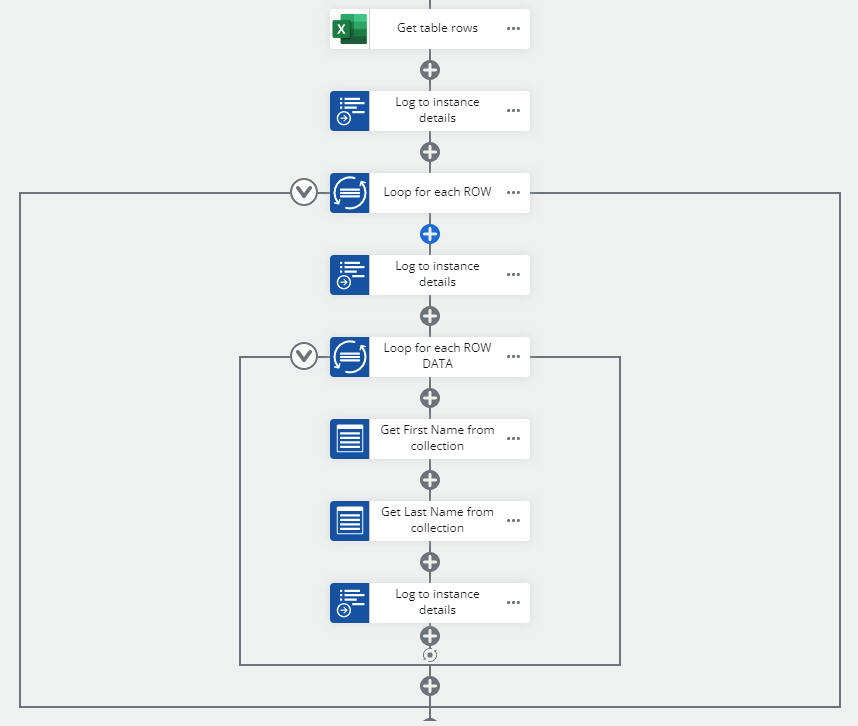
When getting data from Excel it returns an object. Within the object there will be collection of rows and within that, an index (row number) and a collection of the row data. The row data is what we need. Understanding how the data is organized will help us when building out the workflow. Below is an example on how I approached it.
- Loop through the collection of rows
- Loop through the row data collection
- Get data from row data collection for each column needed (in my scenario, I only need the first two columns for first and last name)
Now that we have the data, we can send it off to compare against other systems of record, upload to a SQL table, or anything else within the workflow.
Final Thoughts
This was an interesting use case because of the need to upload a file and then query that file for the data within it. This pushed us to build out an xtension to get the workbook ID from OneDrive. While the above scenario was simple, it proves out that we can easily get the data from the Excel file and continue to do the rest of the process as designed. I would also encourage users to evaluate both ways of getting data from Excel; row data vs. columns data. Using the column data action returns the data slightly differently since it does return the column name that was used in the table. This is extremely useful if you do not know what the data is and need to out context around the process.

Leave a comment