There are plenty of reasons that we would want to view data on a form but pulling that data from other sources can be difficult. Not only that but formatting that data so that it is readable by the end user is just as important! With Nintex Forms for SharePoint we can easily pull back SQL data, but we can also pull back multiple records and then present them in a way that an end user can easily consume. Let’s look at how we can achieve this.
Form Setup
In your form, you will need a Repeating Section control that will be used to add each record from the SQL query. Within the Repeating Section, you can add as many controls that you need as they correspond to the columns you will be getting from your SQL query. For this example, I will be querying for “property_ID” and “state”, so I will need two controls in my Repeating Section.

For each control in your Repeating Section, you will need to update the Control CSS Class with a unique name so that we can push the SQL data to it. In mine, I set the control for Property ID as “rs_propertyid” and State as “rs_state”.

We will also need to make sure that the Repeating Section itself has the proper CSS classes. Some of these are set by default, but to be sure, make sure your Repeating Section looks like this:

Now that we have where the data is going all setup and configured, we should go and get that data! For this we will use the SQL Request control. Place the SQL Request control anywhere on your form. If you have not setup this control in the past and need some assistance, check out the Nintex Help Files and specifically look for the SQL Request. You will need to select the server and database where you want to pull from and then add your query. For the query, we want to be sure that it returns in a format that we can easily work with in the form. This would be XML, so here we can add FOR XML PATH (‘record’) and return the data in XML. Here is a sample:
SELECT TOP(1) (
SELECT
property_ID,
state
FROM TABLE_NAME
WHERE agent_ID = 'XXXX'
ORDER BY property_ID
FOR XML PATH('record'))
as datatable FROM TABLE_NAME
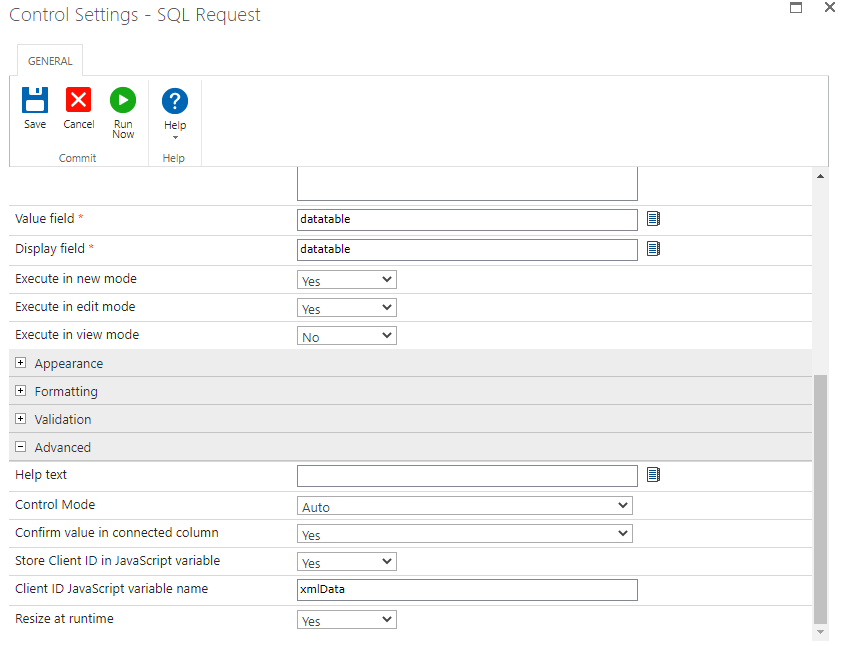
Final steps for this control are to be sure to set the Value field and Display field within the SQL Request control as “datatable” and enable the data to be stored as a JavaScript Variable. This is important as it allows us to grab the data and then do something with it!
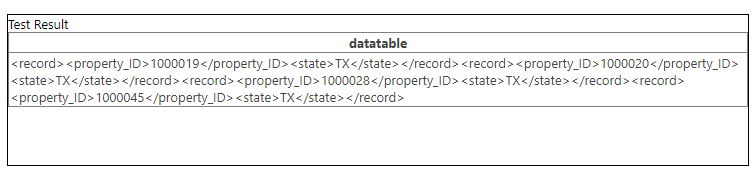
If you perform a “Run Now” you should get a result like this:
So now we have the SQL control getting the data, and the Repeating Section setup to receive the data, but we need to push the data from the SQL control to the Repeating Section. We do this via adding a custom script to the form.
The Script
If you are unfamiliar with JavaScripting, that is ok. I took a simplistic approach to this so that anyone can easily add more data points if needed. That said, I am sure that there are more eloquent ways to accomplish this. For now, we know this works! I will break this down a bit and walk through it but if you want to skip over this and get right to the script, the full script is as the end.
The first function that we need to build out is to process the data. We need to pull the SQL XML data into the something that we can work with. From there, we will match each record using RegEx and create a new array to hold all of our parsed data. I added comments for placeholders if you want to add more data points to query. You may notice there is a line to delete the last row in the Repeating Section, this is to clean up the form a bit and only present the queried data.
function processData() {
	/*Get XML Data*/
    var sqlXML = NWF$("#" + xmlData).val();
    /*Break XML apart for each record using RegEx*/
    sqlXML = sqlXML.match(/<record>(.*?)<\/record>/g);
    /*Create new array for all parsed data*/
    var parsedData = new Array();

    /*For Each Record, pull out the Property ID and State*/
    NWF$.each(sqlXML, function(i, val) {
        var xmlRowData = NWF$.parseXML(val);
        var NWF$xmlRowData = NWF$(xmlRowData);
    	var tempArray = new Array();

    	/*Here you can add or remove as many data points you may need*/
        var tempPropertyID = NWF$xmlRowData.find("property_ID").text();
        var tempState = NWF$xmlRowData.find("state").text();
        /*EXAMPLE: var tempYourVariable = NWF$xmlRowData.find("YourDataFromSQL").text();*/

        tempArray.push(tempPropertyID);
        tempArray.push(tempState);
        /*EXAMPLE: tempArray.push(tempYourVariable);*/

        parsedData.push(tempArray);
    });
    processArray(parsedData);
    /*Delete Last Row In Repeating Section*/
    NWF$('.repeatingSection .nf-repeater-row:last').find('.nf-repeater-deleterow-image').click();
}
Now that we have the data in an array, we can process the array and add it to our Repeating Section. We do this by pulling out each data point we added to the array and putting it into the corresponding control within the Repeating Section. We also remove the “Delete Row” image to avoid data being deleted from the form. Lastly, we add another row to the Repeating Section and loop back through the array.
function processArray(array) {
	function addRow() {
		var currentRow = 0;
		while (currentRow < array.length) {
			var i = currentRow;
			/*Add data to Repeating Section*/
			/*Here you can add or remove as many data points you may need. Be sure to increment 'n' in array[i][n]*/
			NWF$(".repeatingSection .nf-repeater-row:last").find(".rs_propertyid").val(array[i][0]);
			NWF$(".repeatingSection .nf-repeater-row:last").find(".rs_state").val(array[i][1]);
			/*EXAMPLE: NWF$(".repeatingSection .nf-repeater-row:last").find(".YourControlCSSClass").val(array[i][2]);*/

			/*Remove image for row deletion if you want to not allow delete*/
			NWF$(".repeatingSection .nf-repeater-row:last").find(".nf-repeater-deleterow-image").css("visibility", "hidden");
			/*Create next row*/
			NWF$(".repeatingSection").find("a").click();
			currentRow += 1;
		}
	}
	addRow();
}
Putting it All Together
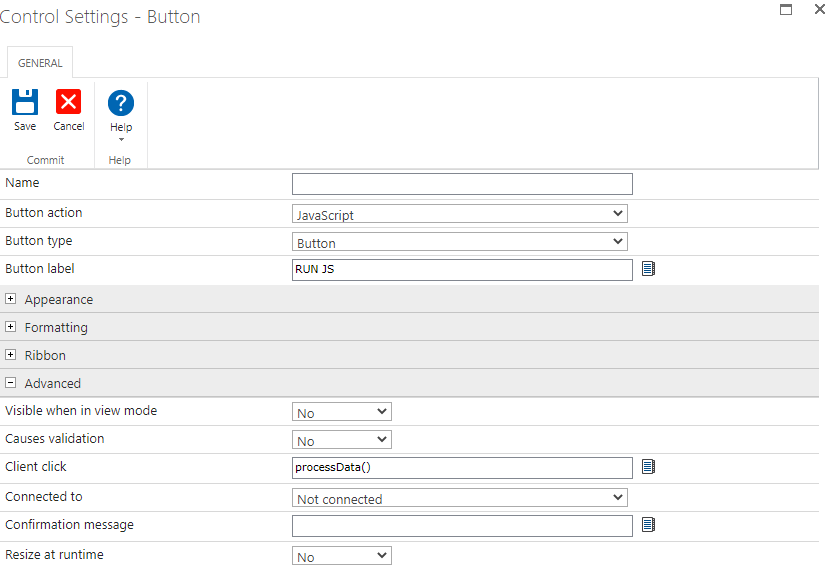
Now that we have the form setup to query the SQL data and capture it in a XML datatable, as well as the script to handle parsing the data and placing it into the Repeating Section, we just need to trigger it! This could be done in a variety of ways such as when another control is filled in or even when the form is loaded. I decided to do something a bit more direct and added a button. When you want to have the script execute, just push a button! To do this, we add a button control to the form and set the action type to JavaScript. Give it a label and then set the client click to our processData() function.
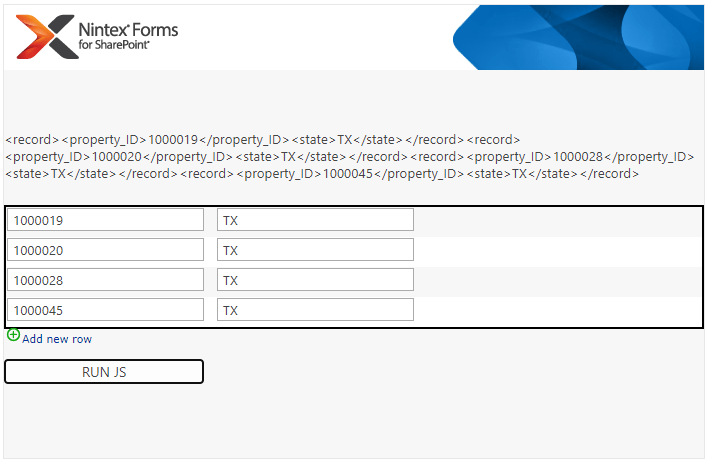
End Result

Final Thoughts
I am not a JavaScript wiz by any means, so I am sure there are plenty of more “eloquent” ways to approach this, but it does work! From here, we can take the Repeating Section XML and perform a variety of actions with it. I wrote some other articles about this over in my Nintex Blogs, so be sure to check them out if you want to take this solution further and build a workflow to automate more!
Entire Script
function processData() {
	/*Get XML Data*/
	var sqlXML = NWF$("#" + xmlData).val();
	/*Break XML apart for each record using RegEx*/
	sqlXML = sqlXML.match(/<record>(.*?)<\/record>/g);
	/*Create new array for all parsed data*/
	var parsedData = new Array();

	/*For Each Record, pull out the Property ID and State*/
	NWF$.each(sqlXML, function(i, val) {
		var xmlRowData = NWF$.parseXML(val);
		var NWF$xmlRowData = NWF$(xmlRowData);
		var tempArray = new Array();

		/*Here you can add or remove as many data points you may need*/
		var tempPropertyID = NWF$xmlRowData.find("property_ID").text();
		var tempState = NWF$xmlRowData.find("state").text();
		/*EXAMPLE: var tempYourVariable = NWF$xmlRowData.find("YourDataFromSQL").text();*/

		tempArray.push(tempPropertyID);
		tempArray.push(tempState);
		/*EXAMPLE: tempArray.push(tempYourVariable);*/

		parsedData.push(tempArray);
	});
	processArray(parsedData);
	/*Delete Last Row In Repeating Section*/
	NWF$('.repeatingSection .nf-repeater-row:last').find('.nf-repeater-deleterow-image').click();
}

function processArray(array) {
	function addRow() {
		var currentRow = 0;
		while (currentRow < array.length) {
			var i = currentRow;
			/*Add data to Repeating Section*/
			/*Here you can add or remove as many data points you may need. Be sure to increment 'n' in array[i][n]*/
			NWF$(".repeatingSection .nf-repeater-row:last").find(".rs_propertyid").val(array[i][0]);
			NWF$(".repeatingSection .nf-repeater-row:last").find(".rs_state").val(array[i][1]);
			/*EXAMPLE: NWF$(".repeatingSection .nf-repeater-row:last").find(".YourControlCSSClass").val(array[i][2]);*/

			/*Remove image for row deletion if you want to not allow delete*/
			NWF$(".repeatingSection .nf-repeater-row:last").find(".nf-repeater-deleterow-image").css("visibility", "hidden");
			/*Create next row*/
			NWF$(".repeatingSection").find("a").click();
			currentRow += 1;
		}
	}
	addRow();
}

Leave a comment