I wrote a blog some time back going over the benefits of using a state machine in Nintex Workflow. I wanted to revisit that idea but bring it into the cloud space as so many organizations are doing today. The Branch by stage action is the same concept as the State Machine action that you may have seen in other versions of Nintex Workflow (Nintex for SharePoint and Nintex for Office 365). The logic behind it is the same, so if you have used it in the past, you know how powerful and useful this action can be! If not, no worries, I am going to explain it here. If you are looking for State Machine by Example for on-premise, check out this blog.
Scenario
For this, let’s frame it as a software request and approval process. Here is the overall process:
- The end user has the ability to select different software they require to be installed.
- Once submitted, a task is sent to their manager for approval. The manager has the ability to approve, reject, or ask for additional information from the requester.
- If approved, another task sent to IT for approval. IT has similar options; approve, reject, or ask for additional justification from the manager.
- If any task is rejected, a notification is sent to the requester with provided reasons.
- If any task is requesting additional information, it is sent one level up (manager to requester, or IT to manager).
I am not going to get into the form in this blog, but we will keep it simple for now and collect:
- Name
- Employee ID
- Email Address
- Software (from a dropdown)
- Reasoning why software is required

One thing to call out on the form is that the software selection is within a repeating section. This is important as users are able to request multiple applications to be installed within a single request, but also because we will need to parse that data to make it usable within notifications. Let’s dive into the workflow itself.
Workflow
Here is the workflow when it is minimized and collapsed down:
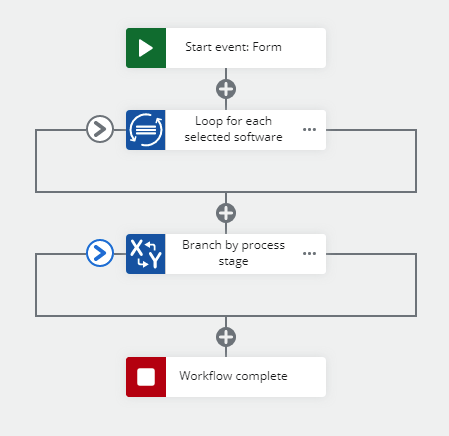
Seems simple, but let’s take it one section at a time.
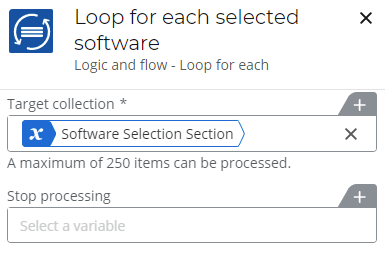
First off, we are going to use a Loop for each action to get each software selected and the corresponding reasoning so that we can present that in notifications later in the workflow. To do this, we will select the Repeating section that we used in our Start Event Form as the collection to loop through.
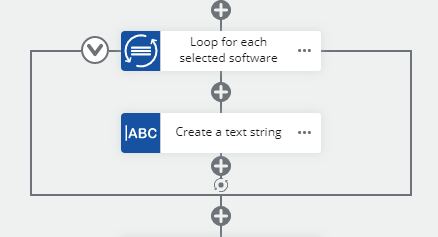
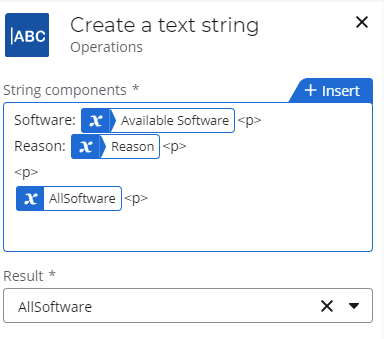
Within the loop itself, we are going to use a Create a text string to concatenate all of the selected software into a single text variable. In order to keep it easier to read and formatted, I added a <p> tag:
These steps are not required to make the rest of the workflow work properly, but it does make it easier to read for those reviewing the submissions. Keep that in mind that it is not just the requester that it needs to be easy for, but everyone that is involved in the process! Now that we have the housekeeping steps completed, we can move to the approval process. Here is where we will be using the Branch by stage action.
Branch by Stage

At first glance, it probably looks like a spaghetti monster, but it is really not that bad. The Branch by stage action allows for designers to create repeatable branches of logic that can be called in any order and even reused if necessary. This means we can move in any direction as many times as needed until we exit the action. Think about it in the frame of the software approval process; a user submits a request and then it is sent to the manager for approval. If the manager approves it, it goes to the next stage, which is IT. If the manager requests additional information, it moves to the Requester stage. This allows the workflow to be designed in a very dynamic way rather than linear, thus avoiding bottlenecks or roadblocks within our workflow design. Here are the stages for the example we are building:
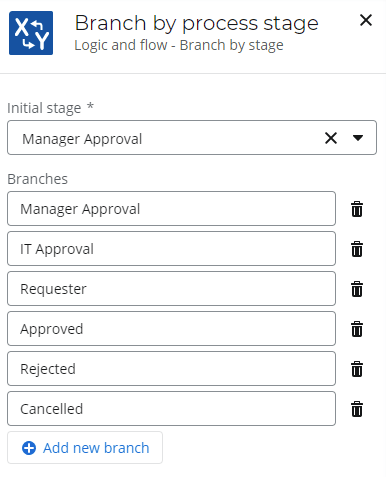
What happens when the manager approves the software request, but IT needs more information? IT now has the ability to send it back to the manager asking for additional justification. This keeps the workflow moving and shifts the responsibility to the proper party. Now IT does not have to track down a manager to get all the details, it is automated based on the logic provided within the workflow.
Now that we have the stages all set, we need to place some actions on each branch. For the manager, IT, and requester, we can use a task action to notify them that there is something to do. Based on the outcome of each task we can move the workflow to the desired stage. Let’s take a closer look at the manager task.
Task
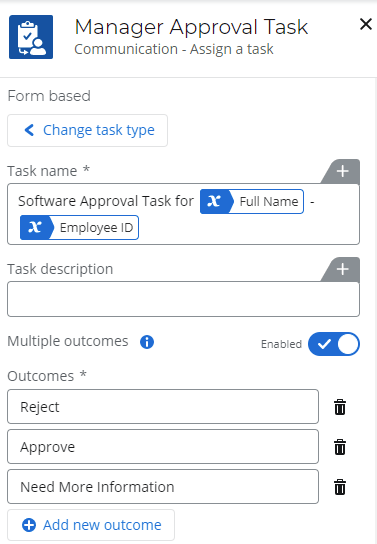
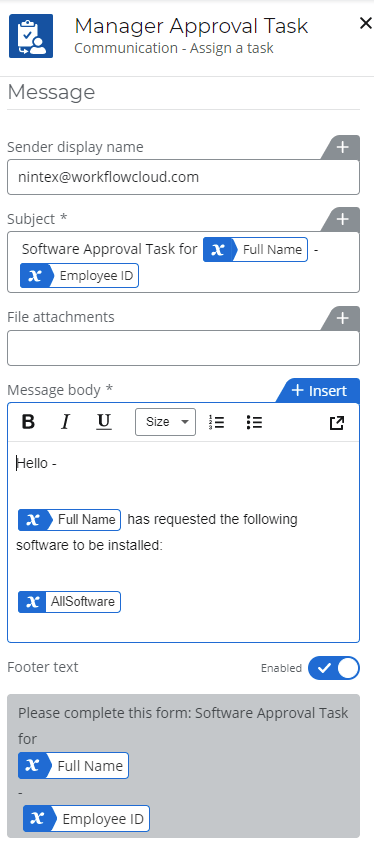
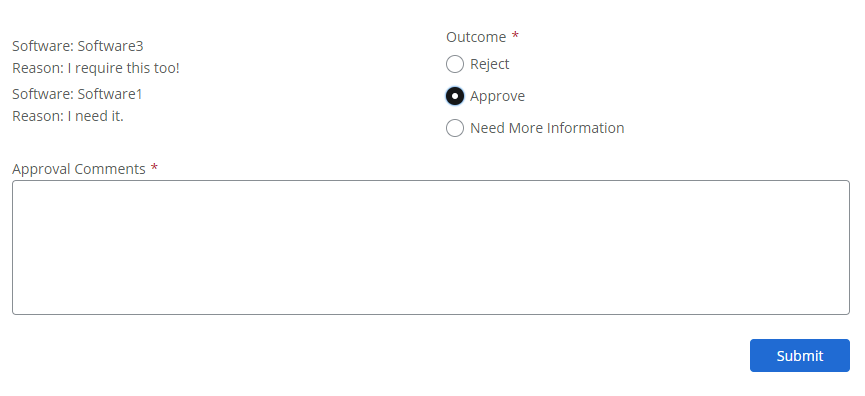
Here we see multiple outcomes (Reject, Approve, Need More Information) that each align with another branch within our Branch by stage action. Also, the task name is using variables so that it is dynamic for each request, thus making it easier for managers and IT to track and manage each request. Scrolling down in the configuration pane, we setup the notification that will be sent to the manager. This is where we can leverage the AllSoftware variable we created in the beginning of the workflow. Here is how it looks when sent to the manager:

Now the manager knows what the request is before they open the form to make their decision. Within the task configuration, there is a place to configure the task form as well. Here, we can set the form up to have a place for comments (depending on the selected outcome) as well as a list of the selected software. Again, this is not required, but gives users all the details they need to make a decision without having to jump back and forth between emails or forms.

Form Designer 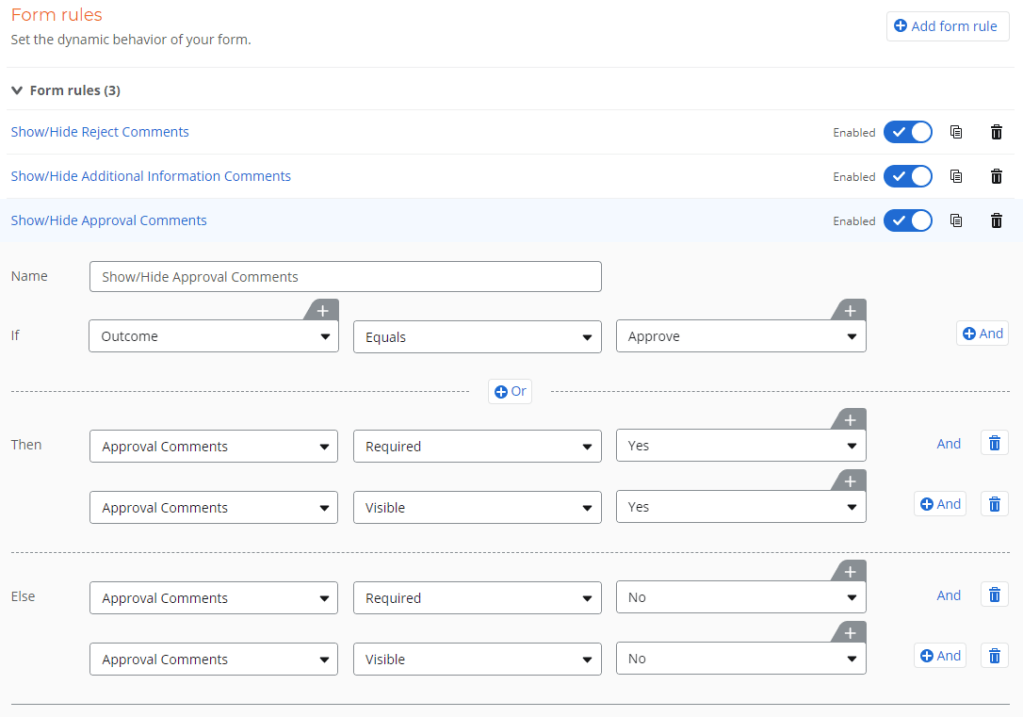
Form Rules
Here is the manager task form they will see based on the above:
Once the manager has made their selection, the workflow will move to the corresponding branch. If the manager needs more information, the process moves back to the requester for additional details and then potentially back to the manager if resubmitted. Again, allowing the process to move forward without creating bottlenecks or having to restart a process from the beginning.
Everything Else
I am not going to go through every action, as many of them are setup the same way, but the idea is that the task outcomes determine where to move next in the workflow. For this scenario, the best case is that the request is approved by the manager and then IT, but we can accommodate for instances where that does not happen, and we need to go backwards.
Another way to think about this is consider an approval processes that focus on money. What happens if the amount is under a certain amount? Does it need to go to each level of approver, or can it be auto-approved? What about amounts that are large and need to go directly to a C-level? Using a Branch by stage action within Nintex Workflow Cloud easily allows for all of these scenarios to be created with ease.
Where to next?
This topic just scratches the surface on many topics. How do we capture comments between stages? How can the conversation between stages be captured? How to approve some items in the request but not all? I want to cover all of these and more, so keep an eye out for my blogs and leave a comment if there is something you want covered!

Leave a comment