In this blog I wanted to expand on a topic I covered about repeating sections in document generation and show how we can easily add in another piece; a signature captured on a form. I get questions around this often as users want to be able to get a signature or sign-off from a user, but do not want to use up part of their subscription from their e-signature of choice. While adding an e-signature tag or image to a document follows the same approach, this post will detail how to use the Signature control within Nintex Workflow Cloud and add that to our generated document. Perhaps we can detail out how to add tags for DocuSign and Adobe Sign in another post, but for now, let’s dive in!
For this scenario, I am going to use the same process and form that I detailed in the last blog, but you can add this functionality to any process that you want. There are plenty of use cases out there on why a form may require a signature from the user filling out the form; sign-off that they received sensitive information, reviewed changes, or read a set of legal terms. In our scenario we want to validate that user read the terms and conditions of the order they are placing, and the signature is them agreeing to them. Now we can add the legal terms and the signature to the generated document (the invoice). I will cover two different ways to add the signature and explain why you would want to use each one.
Adding the Signature Control to the Form
To get started, we first need to add a new page to our form for Terms & Conditions that we can update as well as a signature control. I am going to use some placeholder text for this, but you get the idea of what we are going for! Below that we add in the signature control and set it to be required. We will leave the rest of the form as is (refer to this blog if you want to see how I set it up).

Configure the Generate Document Action

Now we need to add the signature to the generated document. We can do this two different ways. One is super simple and straightforward; we copy paste the Nintex tag into the document where you want the signature to be placed on the document.
The other is to use a placeholder image and replace it with the signature image. Before we can add a tag through the Nintex Document Tagger, we need to add the image to the document generation action.
Open the “Images” section and click on “Add Image”. Give the image you are inserting a name. Since the image is already a variable from our form, we can select File variable and then in the dropdown, select the variable you created (the name of the signature control on your form).
Adding the Signature Image to the Document
Now that we have the image available as an option in our document tagger, we can open our document and place the tag where we want it to go. That’s it, super easy!

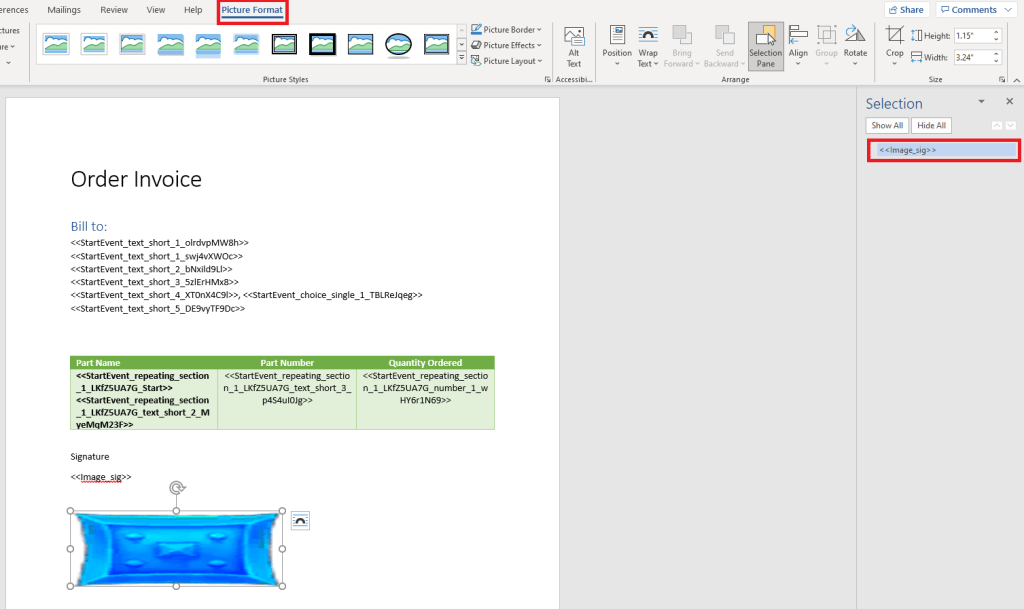
Now let’s add a placeholder image and replace that image with the signature image so we can see the different between the two options. Place your placeholder image in the document where you want it and resize it to be the size you wish. You can also adjust other image options such as style, transparency, border, etc. Once you have everything set for the placeholder image, click on the image and then “Selection Pane” under the Picture Format tab in the ribbon. Here you will be able to rename the image with the document generation tag that you created above.
End Results

You can now save and publish your workflow and run it to see the differences between the two approaches. The first one, where we simply place the tag on the document will make the image the full width of the document.
The second option, using a placeholder image, allows us to resize and adjust the image to better fit out needs.
Final Thoughts
There are plenty of reasons and use cases that you may want to grab a signature from a user while filling out a form. I often think about Employee Handbook signoffs or all those policy signoffs that come up for review each year. It would be super easy to create a simple sign-off form and if needed, push that to a generated document that could be shared with the employee and anyone else.

Leave a comment