With everything that is going on in the world these days, many organizations are looking to get back in the office for a variety of reasons. Whether it is to boost productivity, collaboration, or simply to provide employees with an alternative place to work that is not their dining room or couch, organizations are carefully opening their offices for employee to return to work. As new processes and protocols are put into place, one of the first things that I am seeing organizations do is ask employees to fill out some type of form stating that they acknowledge the potential risks, sign-off they are not showing symptoms, and assist with the smooth transition back to the office.
Like everything else I do, I look at this process and wonder how it could be streamlined and easily adjustable based on the needs of the organization. Nintex Workflow Cloud to the rescue! For this use case, I built out a simple form asking for some basic employee information, when they want to return to work, and a questionnaire. Once submitted, the workflow routes to their manager for review and then ultimately generates a document that can be kept for records. So, let us take a look at the template and discuss where we can improve upon it if needed.
Before we dive in, you can go off to the Nintex Process Accelerator Gallery and grab this Return to Work template and import it into your Nintex Workflow Cloud tenant.
The Form
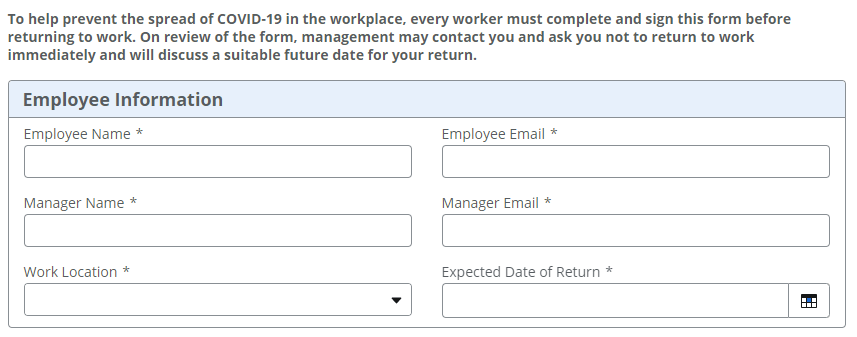
Let us start with the form. I built this around simplicity but could easily use a form template that you have today. In the first section we are asking for some basic data from the employee such as name, email, work location, and expected return date as well as manager information.
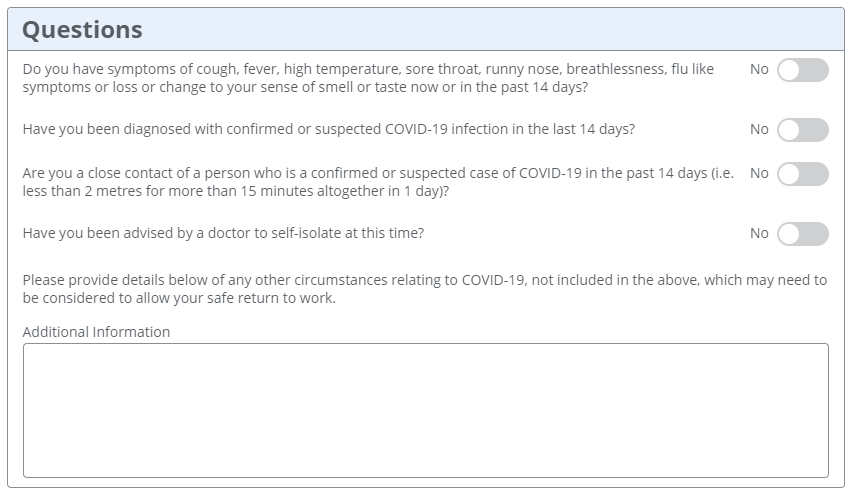
The second part is a questionnaire that I pulled together based on some other examples that I have seen. I kept them simple “Yes/No” questions to avoid having users spend too much time having to fill this out. There are plenty of examples out there if you need something to reference, but I would consult your internal leadership teams to understand what questions you want or need to pose to your employees.
That is the form template that I built out; nothing fancy, but it collects the data that is required to make a decision about the employee returning to work. Now that we have the form setup and ready to go, let us look at the workflow that will run when submitted.
The Workflow
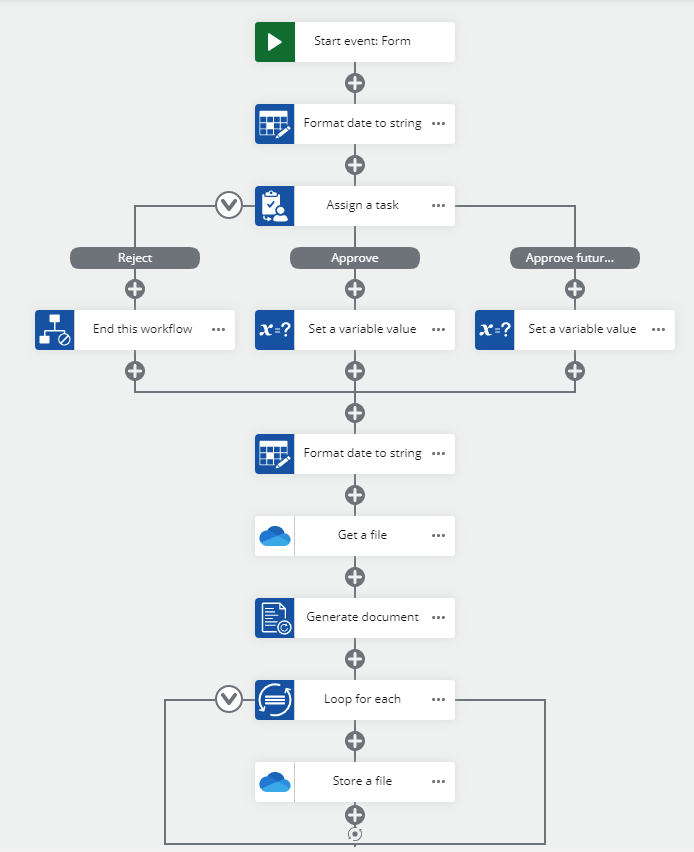
Just like the form, I approached the workflow with simplicity in mind, however, there are a few things that I felt needed to be done. First off, I formatted the Expected Return Date to be human readable. Why do this? No one wants to read a date in a format like “DDMMYYYY::HH:mm::ss-UTC”, something like MMMM DD YYYY (April 22 2021) is a bit cleaner and easier to read. From here we move into the task that will be issued to the manager. If you followed along and downloaded the template from the Nintex Gallery, you will notice it was set to [[Employee Email]]. This was done so no one accidently started emailing their manager!
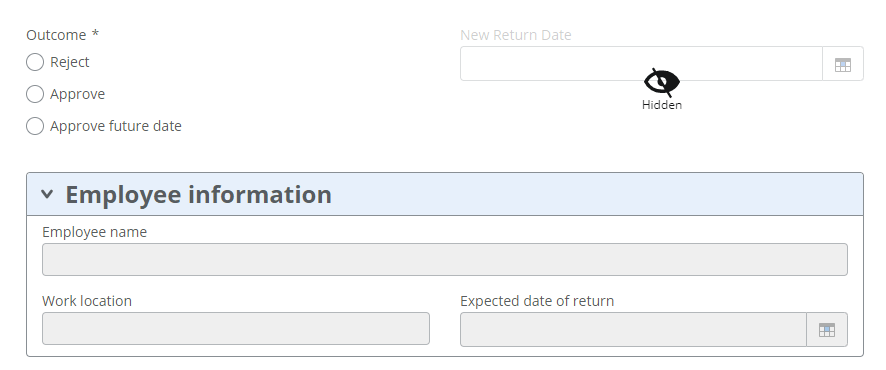
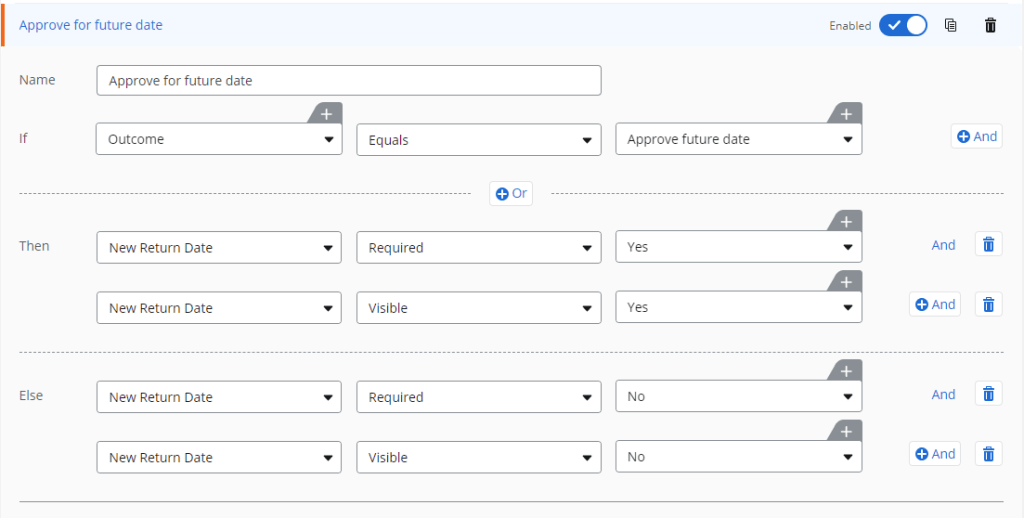
Nintex tasks are easy to configure, but for review, I setup 3 different outcomes: “Reject”, “Approve”, and “Approve future date”. The first 2 outcomes are straightforward enough, but I added a third option if someone wanted to stagger employees coming back or needed to get employees back earlier. Looking at the task form, it is setup the same way as the start event form but with the added Outcome control and a New Return Date control for when “Approve future date” is selected.
In order to accomplish this, we use some basic rules in the form. The rule is setup as below:
The rest of the task form is read only so that the manager or reviewer can see the content but does not have the ability to alter the data. Last piece of the task action is setting up the actions for each outcome. For “Rejected” we are going to simply end the workflow. For both “Approve” and “Approve future date” we are setting the [[ReturnDate]] variable based on the outcome. This makes any further actions are utilize the return date streamlined as it only must reference one variable and not different variables based on the outcome. At this point, our workflow looks like this:

At this point you could end the workflow with some notifications and call it a day. I went one step further and added some document generation so that everyone can have a copy of the collected data. I did not add in any e-signature but will cover that in the last section. If you have not worked with Nintex DocGen, you do not need anything else other than a template to write the content to. If you want to use the sample document that I have in the Nintex Gallery, you can download the template here: Return To Work Template
For this example, I stored the template in OneDrive for Business, but Nintex Workflow Cloud can easily be setup to leverage Dropbox, Box, SharePoint Online, or even Google Drive. Using the Get File action, we point to where the template resides and store that to a variable [[DocGenTemplate]] so that we can easily reference it later. Next, comes the generation of the document we want. Using the template, Nintex Workflow Cloud will populate the template with all the necessary data based on how it was tagged.
Document Tagging and Generation
In order to get data into your document template, open the Generate Document action and click “Open Nintex Document Tagger”. From there, a new window will provide all the various tags that can be copied and pasted into the document. These tags range from data collected in the start event (form in this scenario), data from a task, or context data such as current date and time. Once all the required data points have been added into the document, format the document as needed and then save it (back to the cloud platform).

The last piece is to store the generated document(s) into a Collection variable. This is done because there may be multiple documents and will be stored as a collection which allows for looping logic to pull out documents one at a time. For this example, the variable [[ReturnToWorkDocGen]] does just that. Now all that is needed is to store the final document(s) somewhere. For this, OneDrive for Business will be used again. When completed, the workflow will look something like this:
Final Thoughts
This is a simple example of how an organization could possibly implement some lightweight process around getting employees back to work. Of course, like anything, there are a multitude of other ways to accomplish this and more data that could be collected. Some things that I would consider and implement with this would be:
- Manager Lookup – Have the form automatically lookup the user’s manager information using a Data Lookup against Azure Active Directory
- Workflow Logic – Have requests be auto approved or denied based on certain business logic. This would help managers focus on the requests that truly need attention.
- E-Signature – Have both manager and employee sign-off on the document once it is generated to ensure that everything is accurate.
I am sure that there are other areas or different approaches that could be taken, but this example can easily be modified to fit many different uses and needs by leveraging the power of Nintex Workflow Cloud. Let me know where you would add to this or what you have seen rolled out.

Leave a comment