Hey everyone, back at it again with a quick “How To” guide for Nintex Automation Cloud. This time we are going to focus in on creating threaded task comments so that task approvers can see previous comments in a single view. This comes in handy for a variety of reasons and is something that many users may have leveraged in the past when using Nintex for SharePoint. So let’s dive in and see how to build this out!
The Use Case
In order to frame this better, we are going to follow the use case of a request for information. The process allows users to submit questions to be reviewed and answered. Upon review, comments can be added, questions can be redirected, or requests can be sent back to the original user to further details. All comments along the way are captured and presented back in a threaded view for subsequent tasks for review. This allows all parties involved to see what was said, by whom, and when.
Start At The Beginning
For this process, I decided to use a simple form to capture some information from our user and route for review and answers. Here we see the form with controls for the Question, who to Email Question To, a place to provide their Email address, and an additional place for any required documentation to be uploaded. While I am using these simple controls to demonstrate this use case, your process may have more complex requirements and rules built in. For example, if this were an authenticated form, there would be no need to require the users email address.

With these pieces we can now jump into the workflow side of things and see how to move this between the approvers and the user that submitted the request.
The Workflow
Like everything else when it comes to process automation, there are a lot of different ways that we can build this out. You may have a form start event (something like I built out above), or you may be using a Component Workflow and pass the form data (from another workflow) to it. This is a great approach when you have multiple entry points or perhaps a custom built front end that you want to integrate with. I am going to take the Component Workflow start event approach so you can see that. To start, we want to select the Component workflow start event and create our variables for each of the above controls.

With the variables setup, I can now use a Nintex Automation Cloud form to collect and pass the data or another mode of data capture. As a part of the workflow, the first thing that needs to be done is to create and set a workflow variable for Responsible Email so that we can send the inquiry to them. We can also use the same variable to make any further updates as the process moves along while keeping the original data intact. From here we move into a Branch by State that allows for the process to move between various stages (or states) that we define. In our scenario we will keep it simple and create two branches; one for the Inquiry and the other for the Requester. This will represent the initial branch that they inquiry follows.
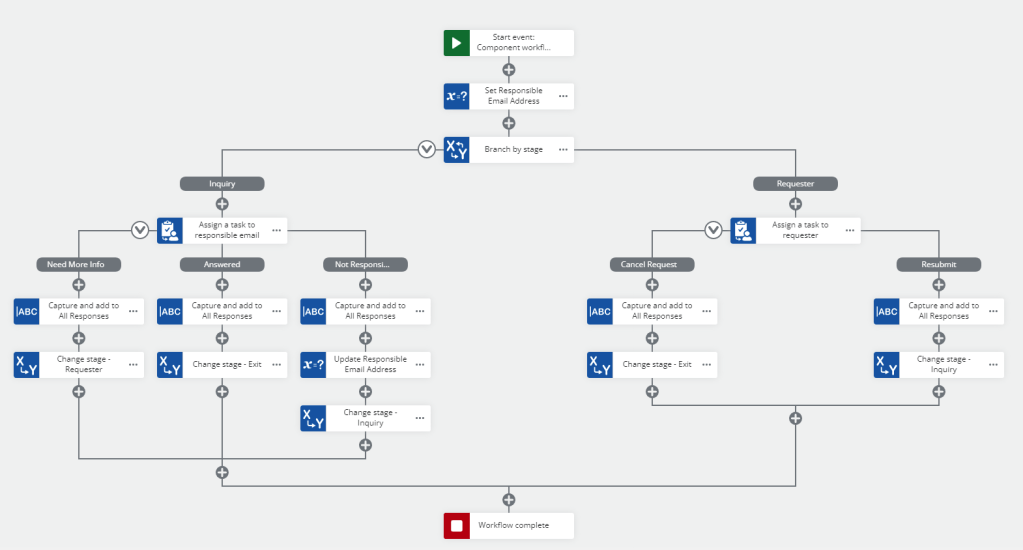
In the above scenario, we present the inquiry to the designated user by using a Task action within Nintex Automation Cloud. The task is setup with three different outcomes that will guide the process to the next step. The possible outcomes are: Need More Info, Answered, and Not Responsible Party. If the assigned user selects Need More Info, the process will move back to the Requester and prompt the request for additional information. If the assigned user selects Not Responsible Party, the user will be prompted to provide a new user in which the task can be rerouted to and thus restarting the Inquiry stage. When Answered is selected, the process ends.
Each outcome of the task moves the process to another part but before the workflow moves we capture the comments that were provided in the task response. This is done by taking the Task comments and adding them to a workflow variable, allResponses. I am also adding some context to the string such as the respondent email address, current date and time, and some HTML tags to help ensure that each response is properly formatted on the subsequent task form. This will allow me to take each response and concatenate them together in an orderly fashion to present on a task form or in an email.


The assigned tasks for the requester follow the same approach; after the provided outcome, the workflow captures all of the responses in the workflow variable and then moves the process to the appropriate next step. For the requester, their outcomes are limited to either provide additional information and Resubmit thus sending it back to the Inquiry branch, or simply Cancel the request and ending the workflow.

Putting It All Together
Now that we have the workflow built out, we can take a look at how it all comes together and gives us that threaded comment view on our task forms and in the final email. I went ahead and submitted a request and document to be reviewed:

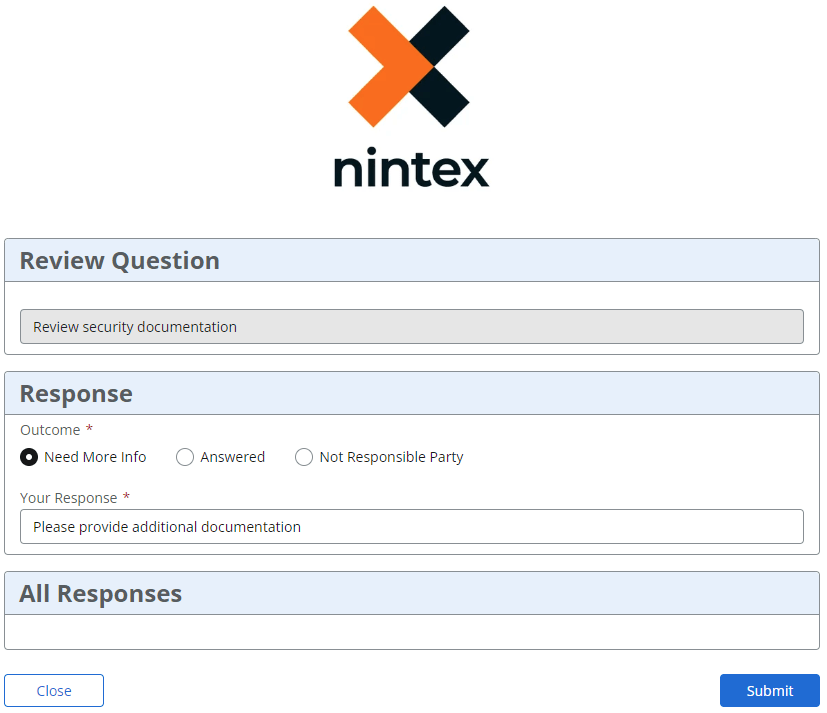
Once submitted, we receive the task to perform our review. For this scenario, we will ask for additional information and send it back to the original requester. You will notice that the All Responses section is blank because no comments have been added yet, that will change!
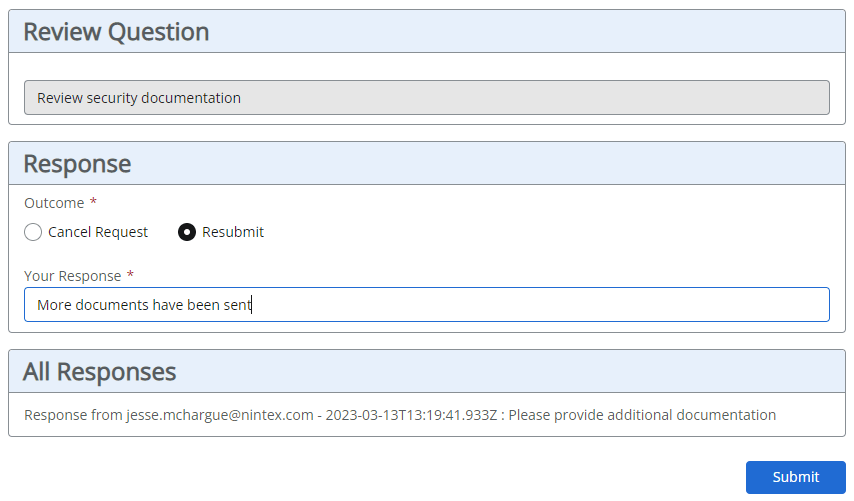
The original requester now has a task to respond to and plans to resubmit with some comments of their own. Here we see that the All Responses section is starting to have content.
Finally, we see that more comments are being added and the task has come back to the reviewer. At this point the process can go on and on as many times as required and all comments will be added to the workflow variable and then presented back onto the form and the final email.


Final Thoughts
Having threaded comments within a task form is a great way to see everything that has been done and said before this task without having to go to a bunch of other tools and find that information. While this example is simple, the approach for this can be applied to any size workflow. There are some things that I would do better here, such as cleaning up the date and time to make it more readable, and perhaps a better forms layout to make it easier to navigate. This will become important with larger forms. Let me know if this is something that you have done in your workflows or if you plan to use it in the future and how you are going to adapt it to your use cases. Until next time!

Leave a comment