There are a lot of complex forms that users interact with on a regular basis and I wanted to review one of the common use cases that we see with Nintex Form; an itemized form. If you are unfamiliar with an itemized form, think of any form where you are adding multiple entries or items on a single form. A great use case for this is an expense report. You would not create a report for each expense, but rather multiple expenses that you will submit in a single report. Let’s look at a simple example of just how easy it is to setup.
Scenario
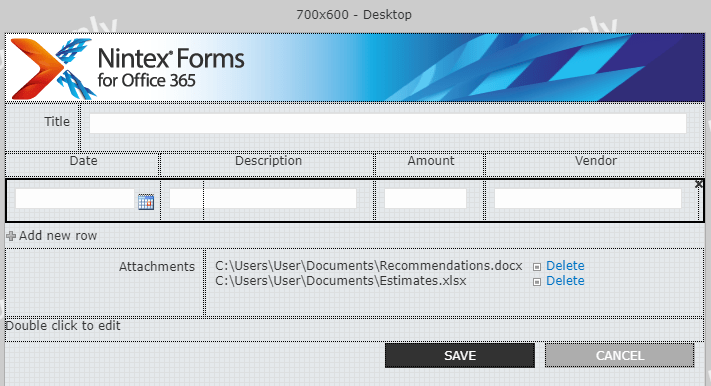
For this scenario, we will be building an expense report that our users can fill out each month from an intranet site within our O365 environment. Let’s keep it simple and build our form to gather the following expense details:
- Date of transaction
- Description of transaction
- Amount of transaction
- Vendor Name
As you can imagine, there are many more things that we can require from our users such as who was in attendance, copy of a receipt, etc. However, adding more data points to our form is straightforward and can very easily be done.
Setup Environment
For this example, we are going to build out a Nintex Form in Office365 using a SharePoint Online site. I have a site already that I will use and created a list called Monthly Expense Form. In this list I created one (1) column:
- RepeatingSectionXML – Multiple Lines of Text
Again, you could add more columns to your list if you want or need to, but for this example, we are focusing on the itemization within the form. The RepeatingSectionXML column will be used to collect all the items that are going to be added to the form. You may be able to guess that we will be using a repeating section within the form, but more on that in the next section. Once I have my site and list setup, we can dive into the Nintex Form designer.
Nintex Form Designer
I decided to build out my form in classic view because there is a need to add CSS to the form. Don’t worry, we are not diving into CSS in forms today! You could use either Responsive designer to accomplish the same thing, however, there are some differences that I will point out at the end.

Starting with the out of the box Nintex Form, we can remove the RepeatingSectionXML label and control and replace it with a Repeating Section Control.


Within the repeating section control, we want to add in all the data points that need to be collected for each expense (see above). To do this, grab a date control and drag it into the repeating section control. We also need a few single line text controls for the other data points. Once you have all your controls added in, it should look something like this:

Now that we have all the controls in the repeating section, each time a user fills out the form, they can easily click on the “+ Add new row” to add another item to the same form. This makes submitting expenses super easy! We could also apply this to requesting new materials on an invoice or even requesting a replenishment of office supplies. The use cases for this are many!
We are collecting the data, that’s great, however, there is nothing detailing out what each control is on the form. That is a problem as the users will not know which control is for the amount, vendor, or description. To rectify this, we simply add some labels outside of the repeating section control. Why outside? We do not want to repeat the labels each time there is a new item. Drag the label control onto the canvas and align it so it is above the proper control on your form:
I would say the form is good to go now. Wait, what about the data the is being collected? Since we are not committing it back to a SharePoint column, where is the data going?
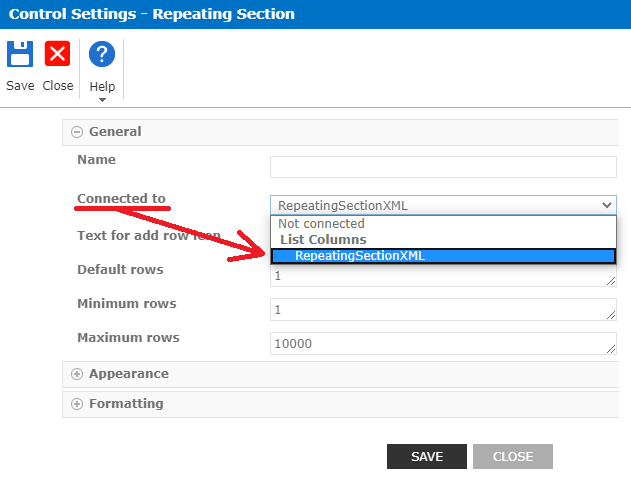
The Form Data
The form data is still being collected in the Nintex Form even if the data is not being committed back to a SharePoint list column. This means that each time I open the form, it will render all the data that was collected in the correct controls. What about when I want to get to the data from the repeating section and use it elsewhere, like within a workflow or another list? There are a few different ways to go about this but one of the most straightforward ways to is to simply connect the repeating section control to a SharePoint list column (I did it here in this blog). In our scenario here, we are connecting it to the RepeatingSectionXML column we created earlier.
Final Thoughts
We see this scenario come up a lot and there are a lot of ways to approach it. This is how I have built out solutions in the past and approach similar ones each time. From here, we can take the XML data within the repeating section and do just about anything with it within our workflow. We could even send each item in the repeating section to another “Itemized” list with a link back to the original form (we will cover that on the next blog). This keeps the original form intact but gives a clean list view for each item in the repeating section for users to perform further actions upon, like reviews and approvals.

Leave a comment