There are plenty of reasons why we would want to skip branches or even go back to a previous one in a Branch By Stage action within Nintex Workflow Cloud. Everything from approvals that need to go directly to an executive to scenarios where more data is required in order to move forward. What ever the reason, moving to the desired stage is easy to setup and can be done a variety of ways. This use case will walkthrough how to do so leveraging task forms and simple logic gates. Let’s dive in!
Scenario
For this one, we are going to look at a multi-level risk review process. This process has 4 different levels, but there are some business rules in place that will determine where and when to move to next. Risks can be Low, Med, High, or Critical, and follow a designated review path depending which level is selected. Here is a breakdown:
- Level 1 – Review Risks: Low
- Level 2 – Review Risks: Low – Medium
- Level 3 – Review Risks: Medium – High
- Level 4 – Review Risks: High – Critical
This means, for example, that a risk review that has been submitted as “High” skips to Level 3 automatically and then moves to Level 4. You’ll notice that each risk level requires at least 2 levels of review, this is by design. Another business rule that needs to be considered is that any review level has the ability to send it back to a previous level for reevaluation. Let’s take a look at how we can accomplish something like this above scenario using Nintex Workflow Cloud.
The Workflow
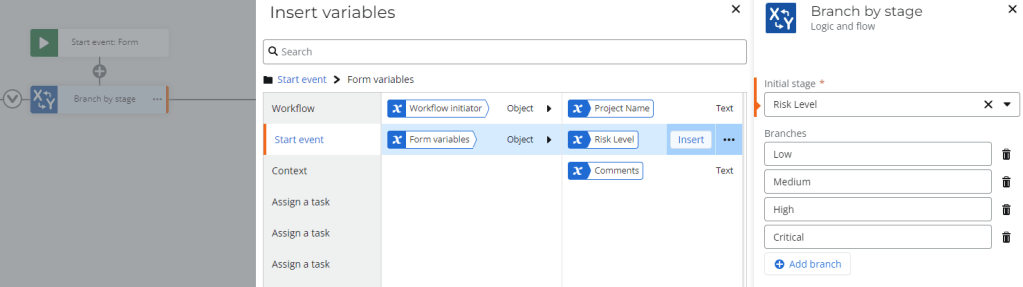
For this, I built out the full 4 level approval workflow, but I want to focus on the Low and Medium levels since we can extrapolate how to build the other branches from these. The form could be anything, but for the sake of our use case, there is a dropdown control that determines the “Risk Level” and we use that to drive where to start in our Branch by stage action.
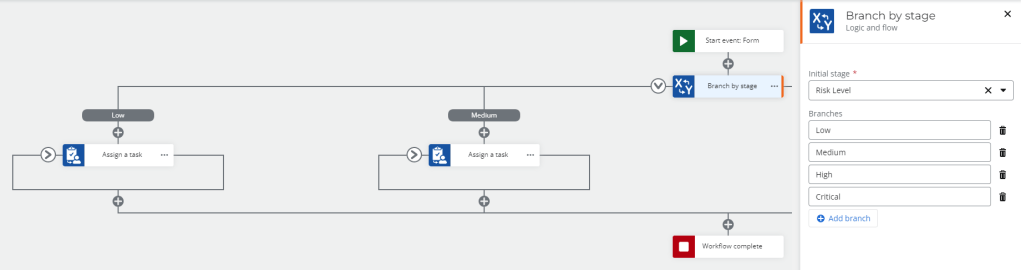
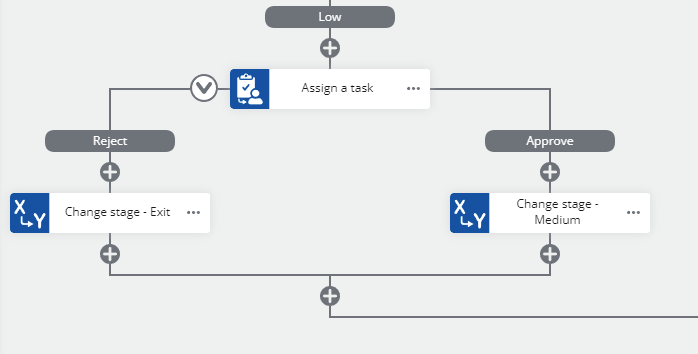
If the form control evaluates as “Low”, it will start here, otherwise it will go to the proper branch. Starting off with the “Low” branch, we see that it is a simple task for someone to review. Here, there are only 2 outcomes that could happen; they Reject it and cancel the process, or they Approve it and moves onto the next branch, “Medium” in this case. Keep in mind that all reviews are 2 levels. Here is how we can achieve this within the workflow.
This is the most simple way to approach multi-stage approvals. Let’s add in some complexity such as what if the “Risk Level” starts at Medium or we need to provide a way for reviewers to send something back for more information. With these in mind, we can take a look at the “Medium” branch in our workflow.
Here we see the basics of the “Medium” risk level task are similar to the “Low” branch but with the additional outcome on the task for “Need More Info”. This allows for reviewers to select an outcome that does not move it forward to the next step nor cancel the process entirely.

You also might be noticing that we are using a “Branch by condition” here as well. This is because now that we are deeper into the process, we need to evaluate what the “Risk Level” is in order to decide where to do to next. In the scenario that the risk is “Low”, this review step is the second review and the process is completed, but if it is “Medium”, the process starts here and moves onto the proceeding branch (“High” in this case).

The same logic and approach can be used when building out the “Need More Info” branch. If the “Risk Level” is “Low” then we can move back to the “Low” branch in the workflow, however, if it is “Medium”, we simply move back to the “Medium” branch effectively re-issuing the task.

Looking back at our risk levels, we see that “Medium” starts at level 2, so how can we start the workflow in the proper branch? If you look at the “Branch by stage” action and how we configured it, we specify the “Initial Stage” by using the “Risk Level” control from our form. This means that whatever the control value is will determine what branch to go down first.
Taking it to the next level
For bonus points, I wanted to see how we could ensure that each review was 2 levels, even in the “Critical” branch. The way I approached this was to nest another task within the “Approve” branch and only go down that path if the “Risk Level” is “Critical”. Since this would be the second level review already for “High” level risks, we can simply exit the branch and move on with the rest of the workflow as needed.

Final Thoughts
There are many different ways to approach this problem within a workflow, but leveraging a State Machine, Branch by stage action in Nintex Workflow Cloud, helps make it easy to build a solution around and easy to understand. You’ll notice that each branch in the action has a “Change stage” action and this is for good reason. Each branch is really just a loop and the “Change stage” action tells the loop where to go to next when it gets to the end. Without that action, you could imagine, the branch would continue to loop!
How are you using the Branch by stage action? Are there other ways that you would have solved this business process?

Leave a comment